
Hockey Injuries and Prevention by Andrew Levanti, DPT, ATC
Hockey season is in full swing with playoffs coming up for most high school and youth leagues. A contact sport, hockey can be very physical, and as the season progresses, higher fatigue levels increase the risk of injuries to the shoulder, knee, and hip/groin. This article breaks down a few of the most common injuries to provide insight into causes, treatments, and injury prevention tips.
Shoulder Injuries
AC Joint: The Acromioclavicular (AC) joint is located on the top outside of the shoulder and is the joint between the clavicle (collarbone) and the acromion which is the top portion of the shoulder blade. An injury to the AC joint is commonly known as a shoulder separation. This joint is frequently injured in hockey by a fall directly onto the "point" of the shoulder, hitting this part of the shoulder into the boards, or a direct blow received during a check. These injuries are characterized by tenderness at the AC joint, bruising/swelling, pain with shoulder motion, and, with more severe injuries, gapping at the outside of the shoulder also known as a step off deformity. The treatment and recovery times of an AC joint depends on the severity of the injury. Most often there will be a grade one sprain which involves minimal separation at the joint and only slight stretching or tearing of the ligament. These types of AC sprains typically take about 2-4 weeks to fully heal and are treated with a short term use of sling to decrease pain, followed by physical therapy for shoulder range of motion and strengthening. AC joint injuries are best prevented by properly fitting shoulder pads. The nature of this type of injury limit the effectiveness of using exercise as a prevention method. However, it is very important complete a full rehab program before returning to play following an injury to help prevent recurrence of injury.
Dislocation: Shoulder dislocations involve the of head of the upper arm coming out of its socket on the shoulder blade. The most common type of shoulder dislocation is an anterior dislocation which is when the shoulder comes out the front of the socket. This type of dislocation typically occurs due to a fall on an outstretched arm, a direct blow on the shoulder, or a forced external rotation of the arm. Treatment for shoulder dislocations begin with reduction of the dislocation. Typically, this takes place following imaging in the emergency department of the hospital rather than directly on the ice to ensure that no nerves or vascular structures are impinged upon reduction of the shoulder. A sling is used for a few days to allow pain and swelling to stabilize. Physical therapy will follow, with a focus on regaining motion and strengthening the muscles surrounding the shoulder to help support the ligaments and capsule that was stretched during the injury. A concern following shoulder dislocation is the development of chronic shoulder instability resulting in subsequent dislocations. Compliance with rehab protocols and not returning to play too soon following a first time dislocation is key to preventing the development of chronic shoulder instability. The focus of rehab and prevention of shoulder dislocation is to increased the strength of the muscles around the shoulder and shoulder blade to provide increase stability. Ensuring that the rotator cuff and the other muscles around the shoulder blade are working properly can help increase stability at the shoulder. The following exercises can be used strengthen the muscles of the shoulder blade and the rotator cuff to improve stability at the shoulder and help prevent dislocations.
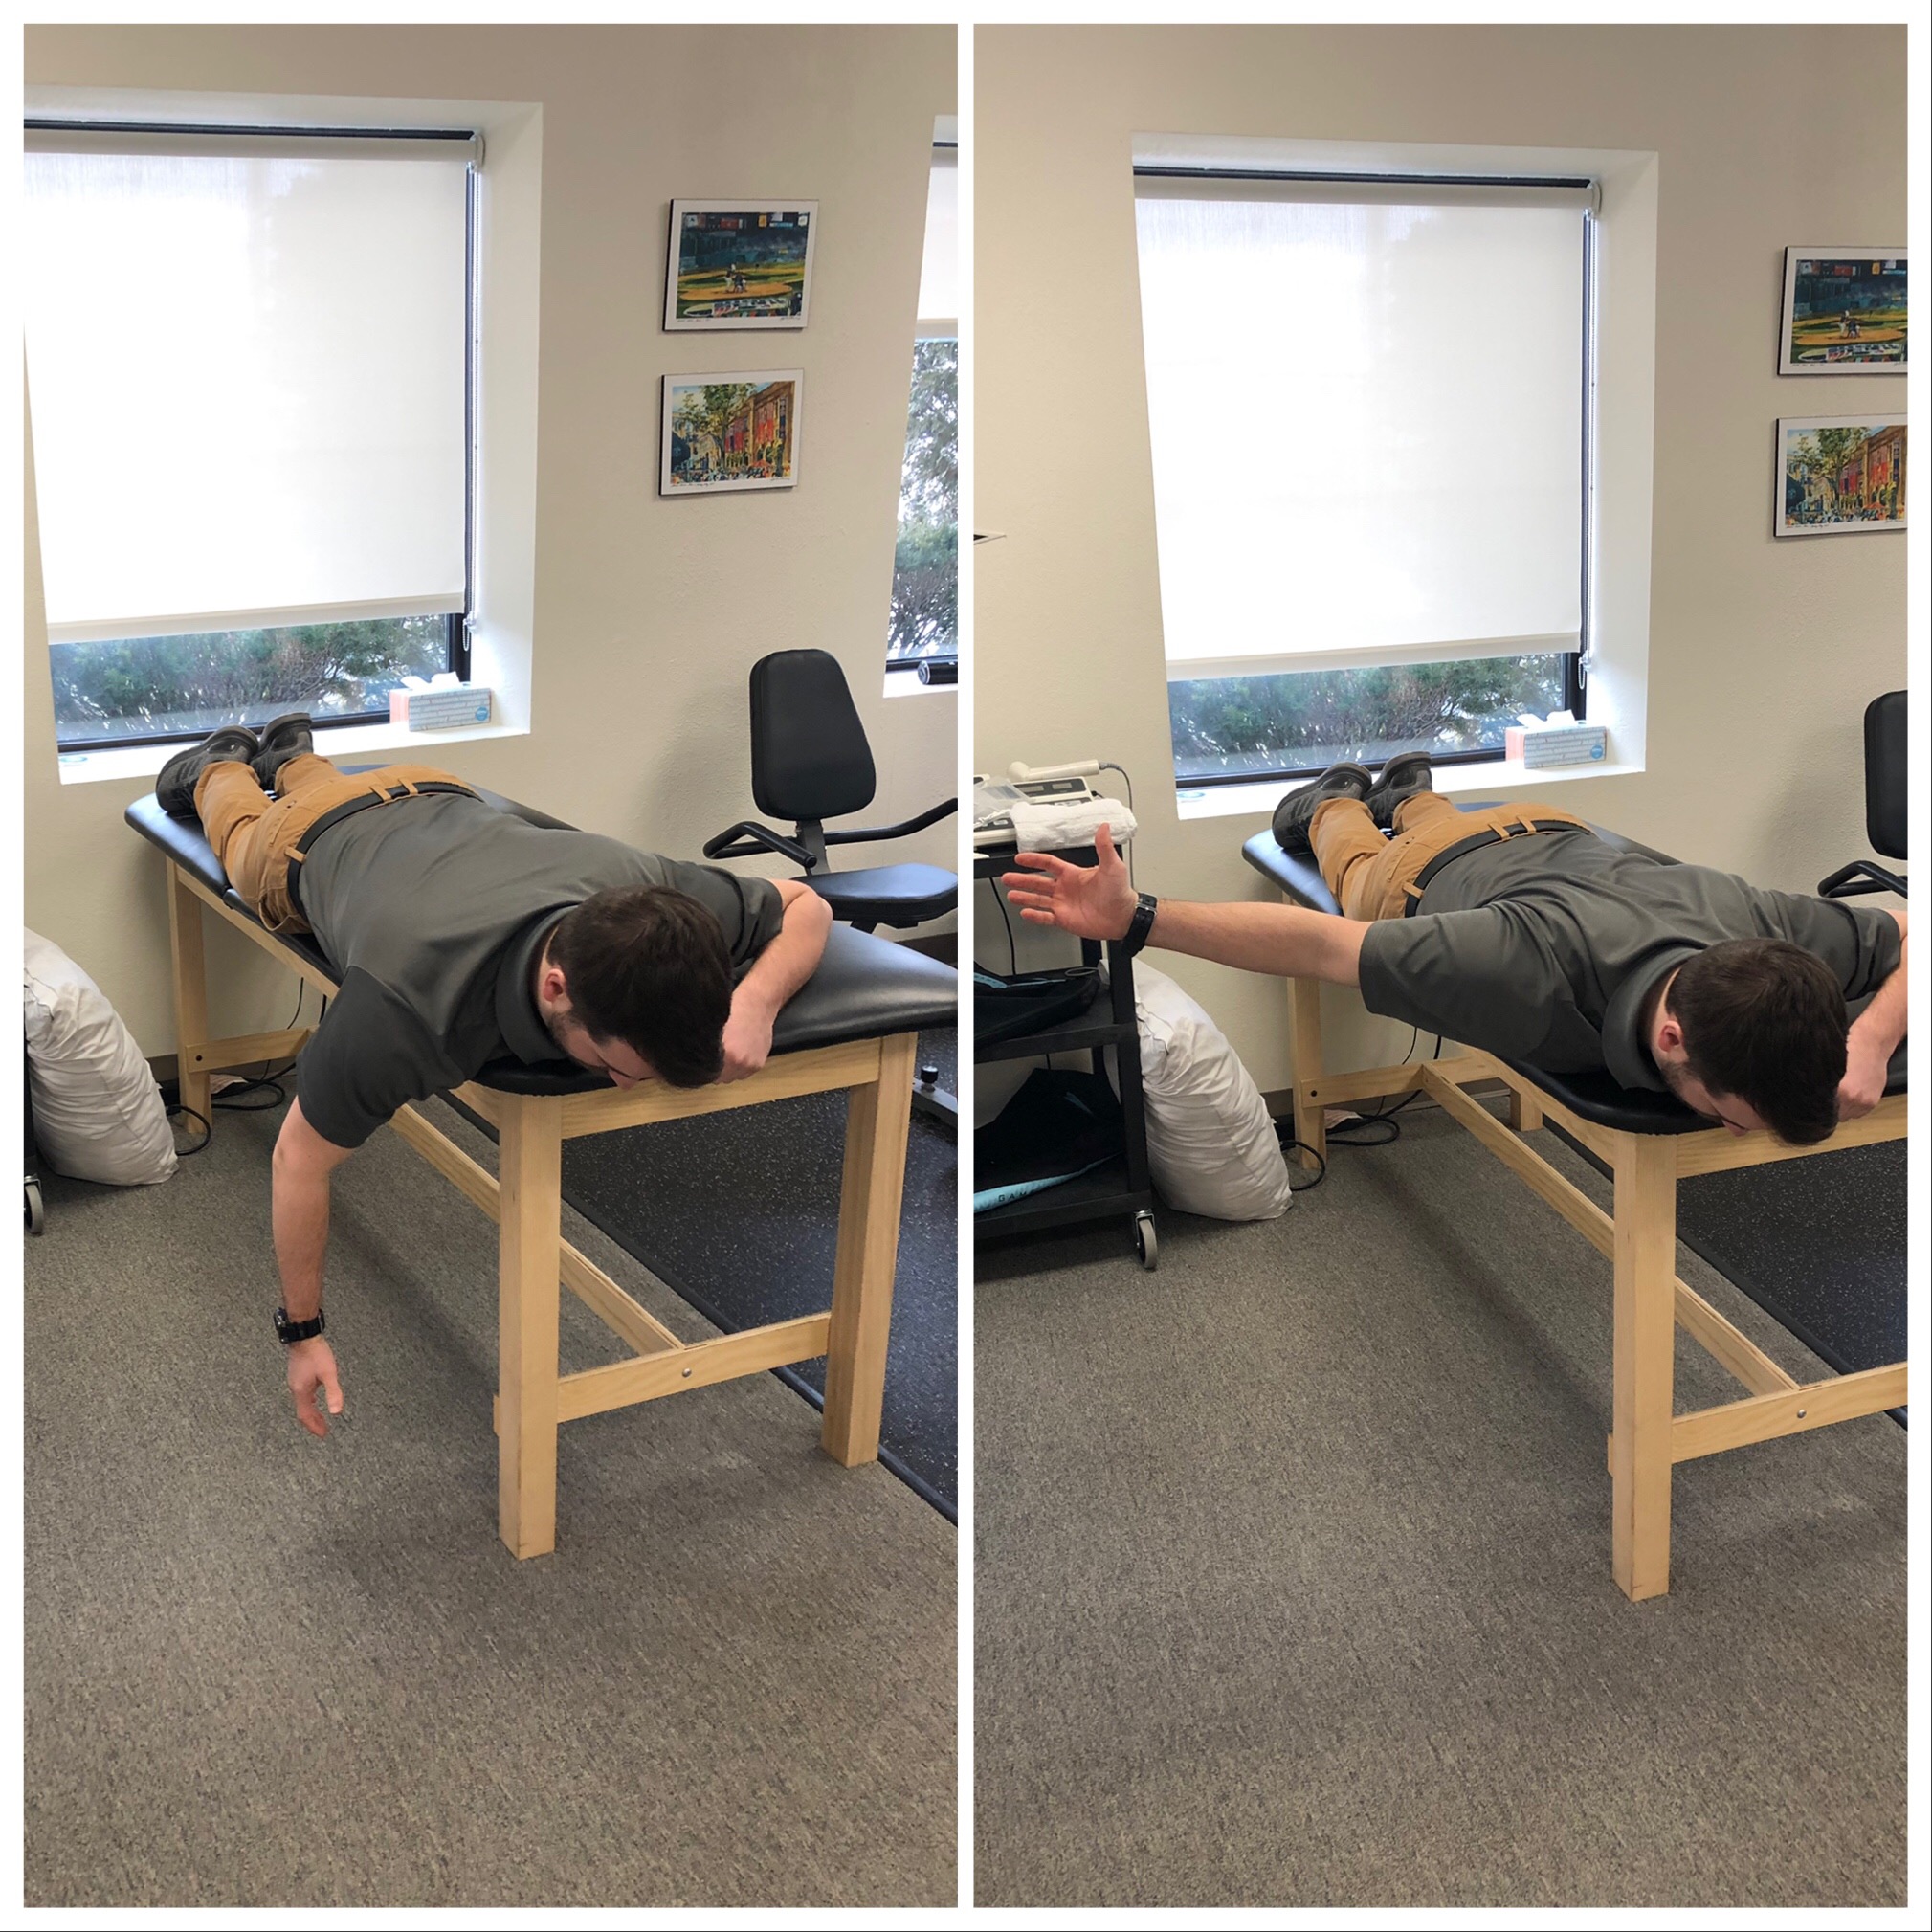
Prone Shoulder Abduction
Start position: lay on your stomach with your arm hanging over the edge of the table or bed. Your head can be off the head of the table/bed, or relaxed with your head on the table/bed facing away from the arm performing the exercise.
Movement: Keeping your elbow straight and thumb pointing up, raise your arm out to your side at a 90 degree angle. Slowly lower your arm back down. Repeat the movement 10-15 times for 2-3 sets on each side.
Sidelying Shoulder External Rotation
Start position: Begin lying on your side with a towel roll between your arm and side, your elbow bent to 90 degrees, and your hand resting against your stomach.
Movement: Slowly rotate your forearm upward. Make sure to keep your elbow bent and tucked in at your side as you lift your forearm. Avoid shrugging your shoulders. Pause briefly at the end of your range of motion. Then return to the starting position and repeat 10-15 times for 2-3 sets on each side.
Knee Injuries
ACL/MCL: Knee injuries in hockey typically involve tearing of the medial collateral ligament (MCL), the anterior cruciate ligament (ACL), or both. These injuries can occur with or without contact and involve a twisting motion (with or without external pressure) or direct pressure onto the outside of the knee. An isolated MCL injury typically will heal on its own and not require surgery unless there is a chronic stability issue following the injury. The time of recovery and missed ice time is dependent on the severity of the injury and can range from 2 weeks to 8 weeks, longer if surgery is required. Physical therapy following injury will include controlling swelling, regaining range of motion, and building strength of the knee and hip. Non-contact ligament injuries can be prevented through on and off ice prevention programs. Injury prevention programs should focus on hip strengthening to provide support at the knee. Squats and lunges are an easy way place to begin.
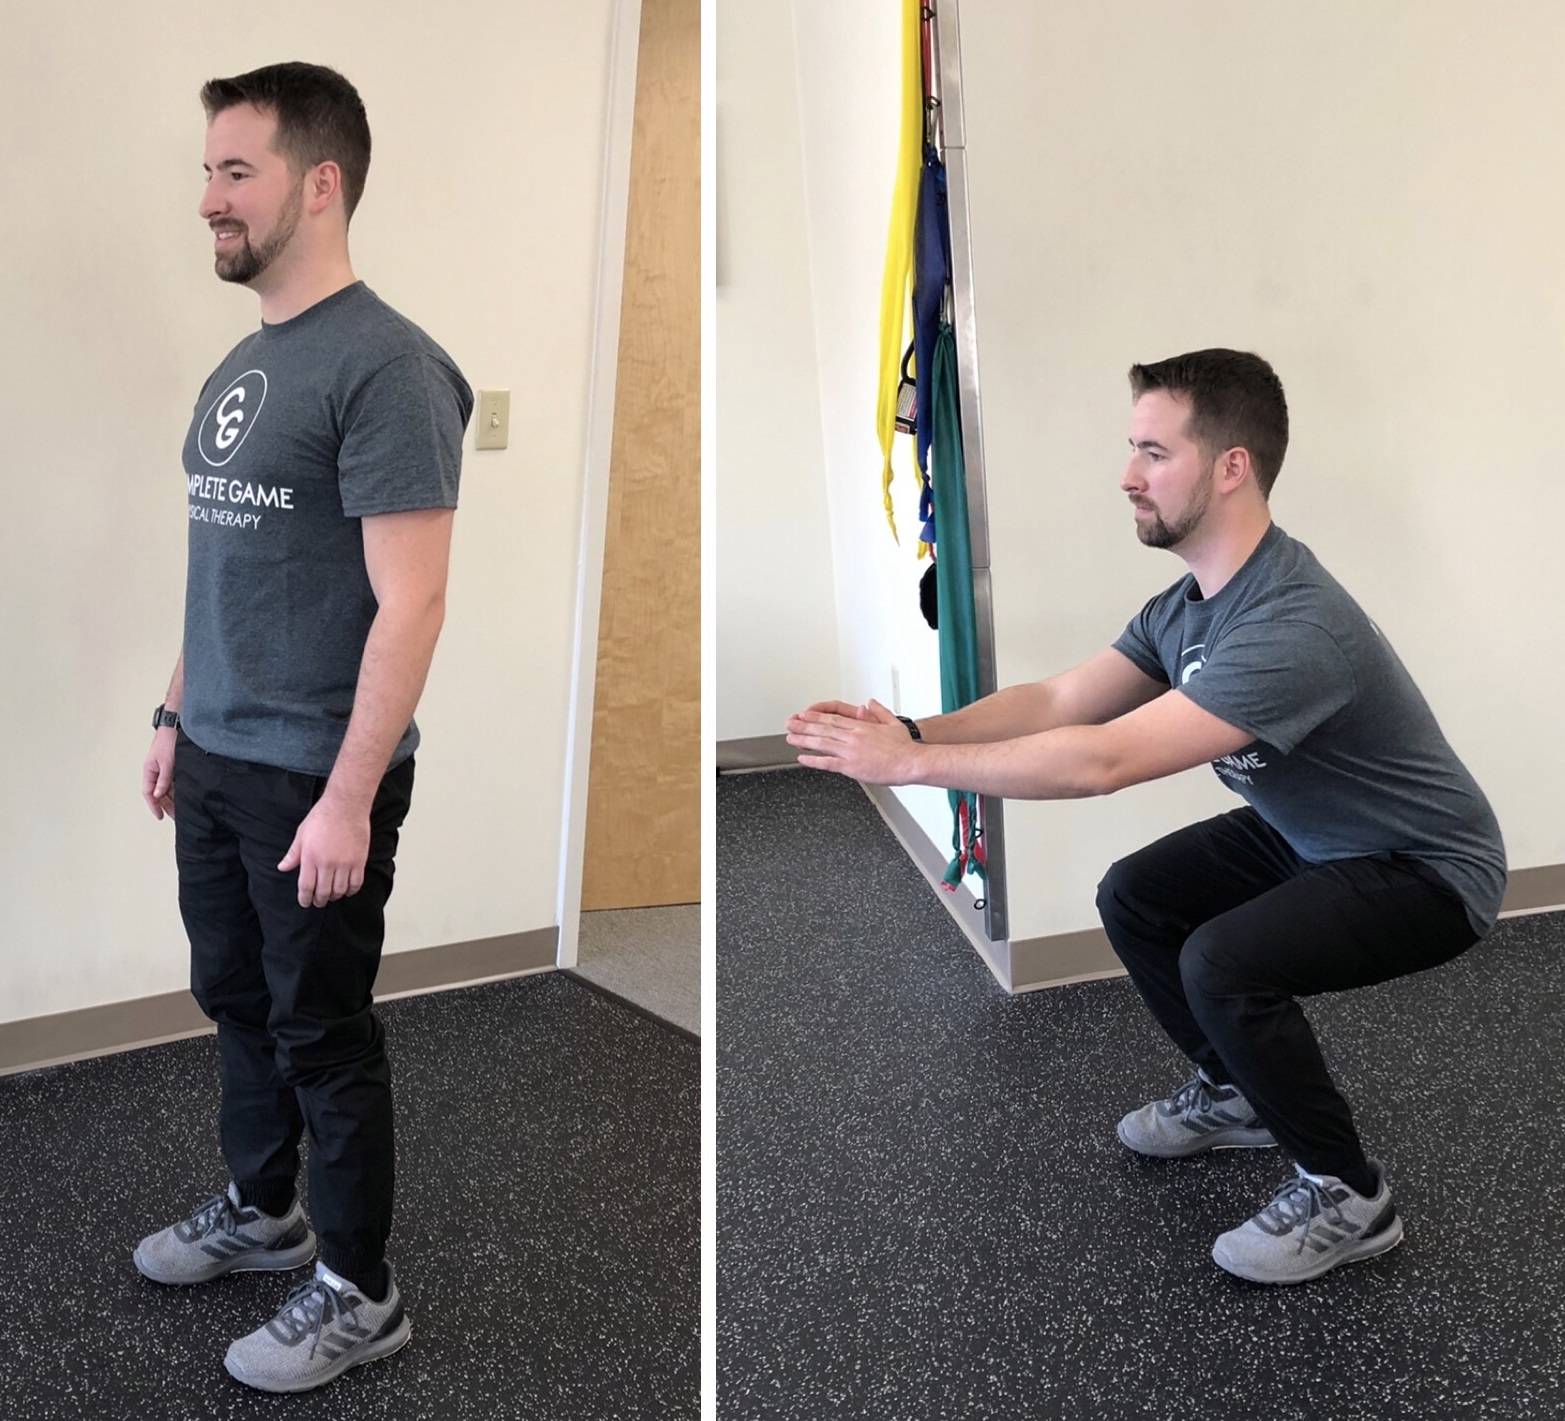
Double leg squats:
Start position: Standing, feet shoulder width apart with your hands at your side
Movement: Bend your knees, sitting back as you lower your bottom toward to the ground until your knees are bent to about 90 degrees. Return to standing position. Repeat for 2-3 sets of 10-15 reps
Lunge:
Start position: Standing, feet shoulder width apart with your hands at your side
Movement: Take a large step forward, lowering into a lunge position by dropping your back knee down toward the ground with your knees bent to 90 degree angles. Then raise yourself up and take a step backward with your lead foot returning to the start position. Repeat motion with your opposite leg. Repeat 10-15 times of each side for 2-3 sets.

Hip/groin Injuries
Hip flexor and Adductor Strains: The muscles used most for skating are the glutes and quads/hip flexors. When either of these muscle groups are weak, an imbalance occurs and can result in the overuse of other hip muscles which leads to tightness and possible injury. Hip and groin injuries in hockey are commonly caused by overuse and weakness of muscles around the hips. Hip flexor injuries involve small tearing to the psoas muscle and/or tendon of the rectus femoris. Adductor strains also known as groin strains involve small tearing of the adductor muscle group on your inner thigh. Treatment of these injuries involve rest, ice, gentle stretching, and general hip strengthening. Depending on the severity of the injury, typical recovery times range from 2-6 weeks. Once again, it is very important not to return to play too quickly following a mild hip flexor or adductor strain as this can result in re-injury possibly more severe than then the initial injury. Injury prevention for hip and groin injuries involve stretching and ensuring proper strength throughout the hips. Dynamic warm ups can help to loosen up muscles and increase blood flow before getting onto the ice and prevent injury. For specific hip flexor and adductor injury prevention, give these two stretches a shot.
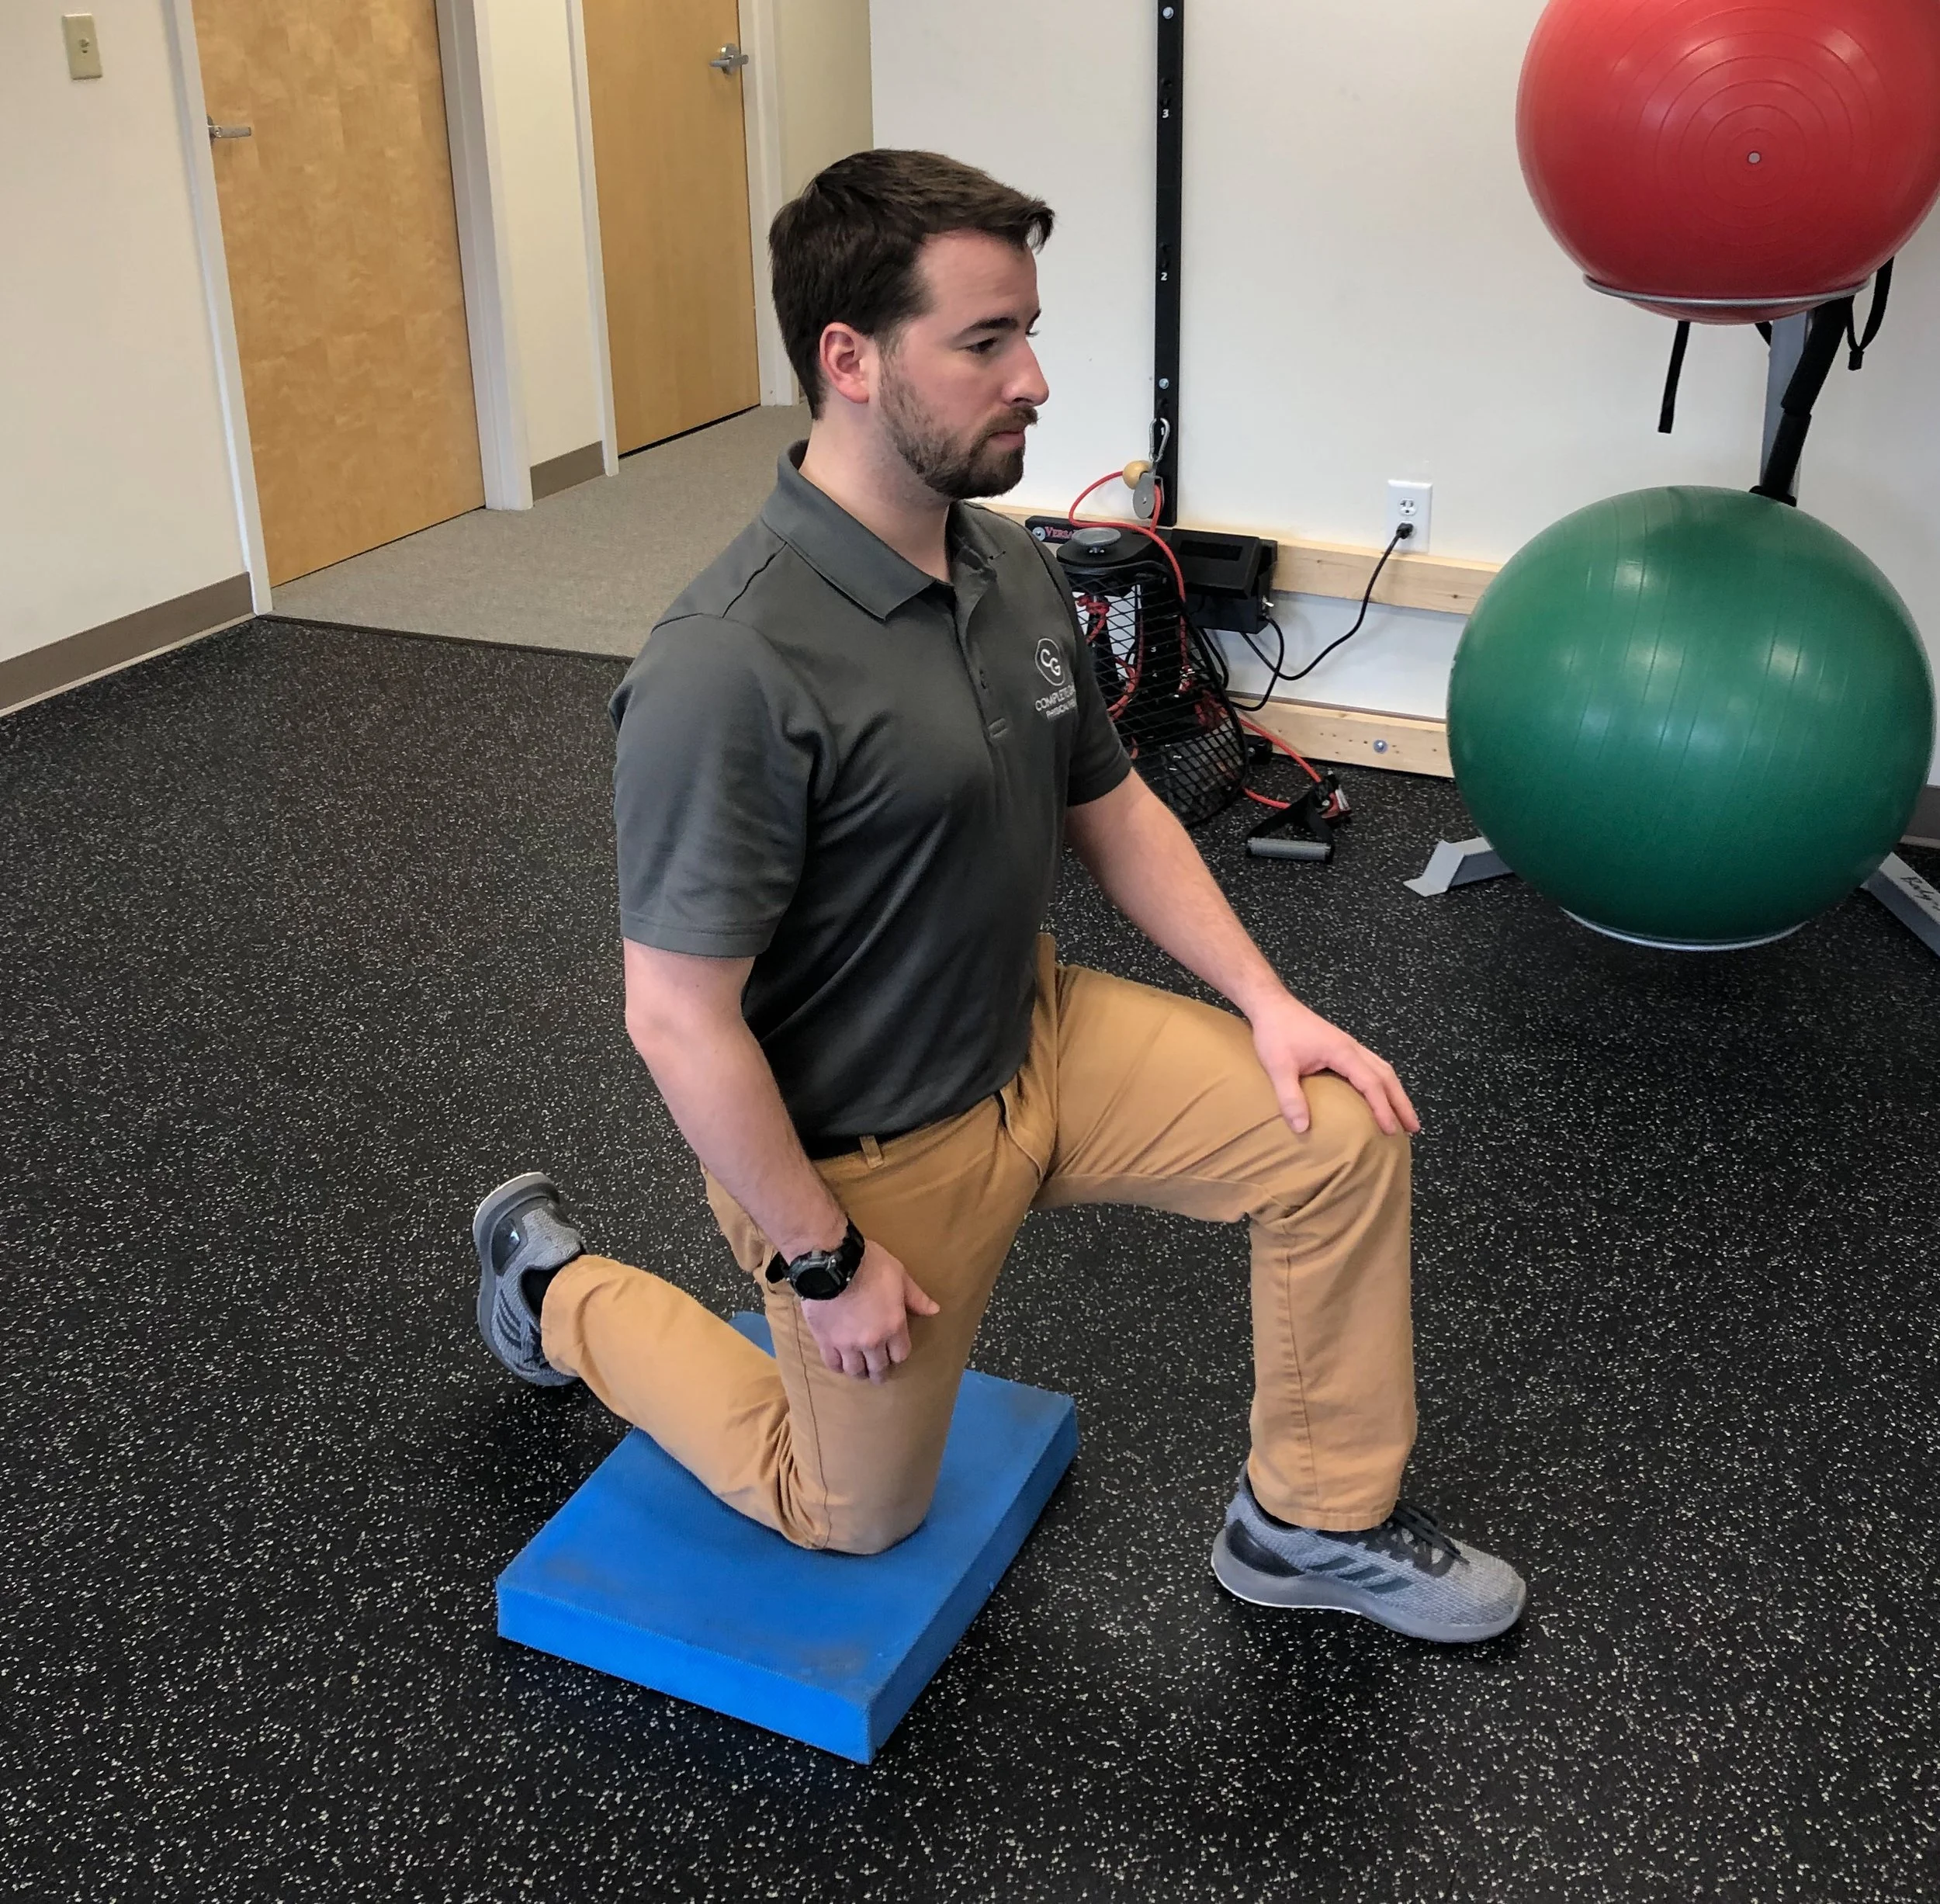
Hip flexor stretch
Start position: Half kneeling with the knee of the side you are stretching down on a mat and the other knee out in front of you.
Movement: Tighten your abdominals, tilt your pelvis backward, and gently squeeze your glutes together. You should feel a stretch in the front of your hip. Make sure to keep your hips facing forward and back straight during the exercise. Hold for 10-15 seconds and repeat 3-4 times per side.
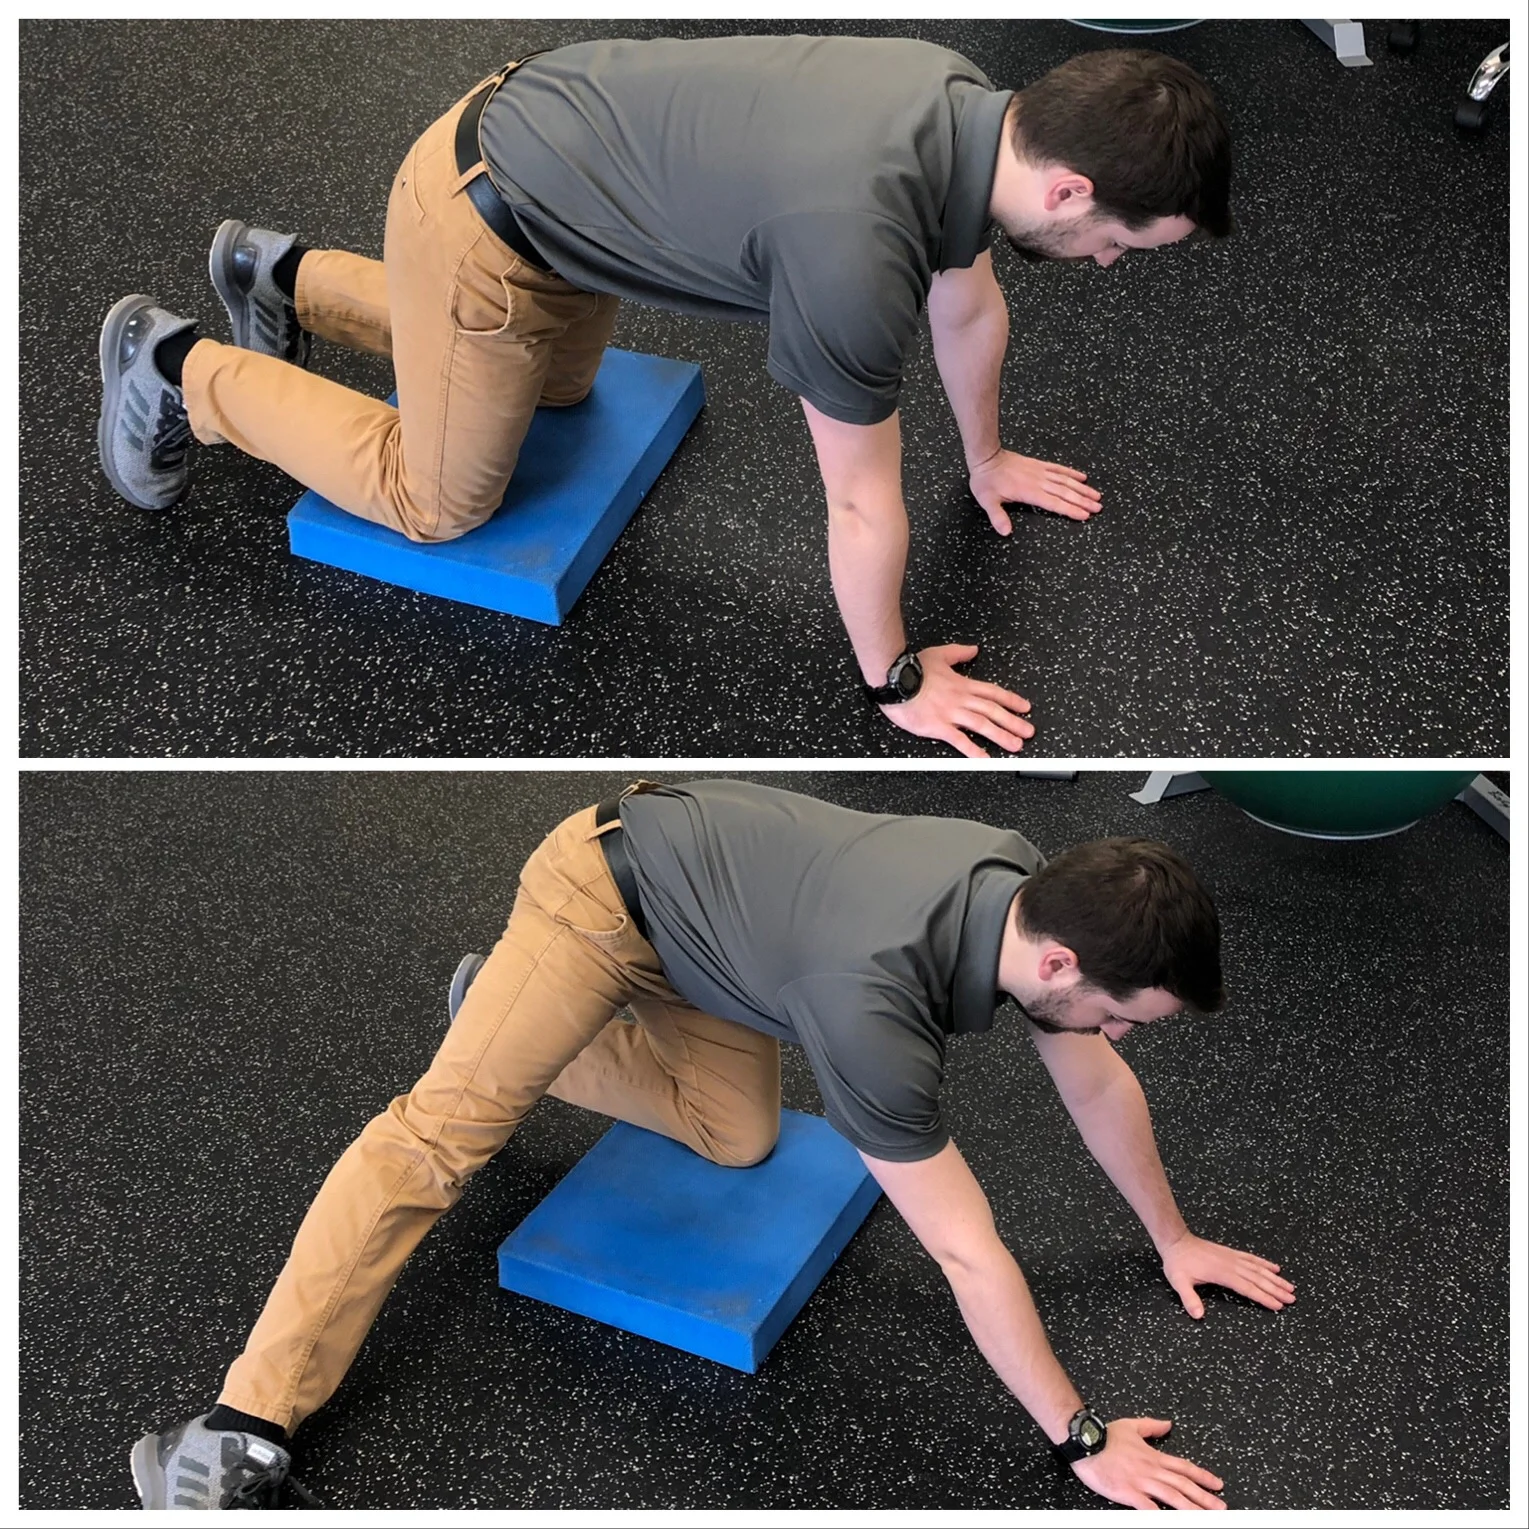
Adductor stretch
Start Position: Quadruped (on hands and knees)
Movement: slide the leg that you are going to stretch out to the side until your knee is straight. Then rock your hips back and to the opposite side. Hold a comfortable stretch for 15-30 seconds and repeat 3-4 times on each side.
Injury prevention is a continuous process that should take place leading up to the season, throughout the season, and after the season. Each phase is unique in its focus, but all have the common goal of keeping the player on the ice and healthy.
At Complete Game Physical Therapy, injury prevention is one of our primary goals. We provide injury prevention screens to ensure that your body is moving properly and efficiently. With the results of the screen, we are able to provide you with a set of corrective exercises to improve your mobility and keep your body moving the way it should and you or your player out on the ice.
If you are are interested in an injury prevention screen or have any questions, please contact us at 978-710-7204 or via email at alevanti@completegamept.com. For video demonstrations of most of the above exercises please check out our Tip Tuesday YouTube Channel by typing Complete Game Physical Therapy into the YouTube Search Bar.